shiro的应用场景
可以在javaSE应用的中的使用;也可以在web应用中的使用;SSM整合(配置多,用的少)。springboot主流
创建SpringBoot项目的过程
使用SpringInitializr快速创建springboot项目,需要集成themeleaf、springboot-web、lombok。使用druid和mybatis当做安全数据传递给realm组件,而且需要连接MySQL。导入以下依赖
1
2
3
4
5
6
7
8
9
10
11
12
13
14
15
16
17
18
19
20
| <dependency>
<groupId>com.alibaba</groupId>
<artifactId>druid-spring-boot-starter</artifactId>
<version>1.1.22</version>
</dependency>
<dependency>
<groupId>mysql</groupId>
<artifactId>mysql-connector-java</artifactId>
<version>8.0.25</version>
</dependency>
<dependency>
<groupId>org.mybatis.spring.boot</groupId>
<artifactId>mybatis-spring-boot-starter</artifactId>
<version>2.1.0</version>
</dependency>
<dependency>
<groupId>org.apache.shiro</groupId>
<artifactId>shiro-spring</artifactId>
</dependency>
|
还需要配置springboot的启动配置文件application.yml。配置数据库连接池和mybatis的参数
1
2
3
4
5
6
7
8
9
10
11
12
13
14
| spring:
datasource:
druid:
url: jdbc:mysql://localhost:3306/ShiroDB?characterEncoding=utf8&serverTimezone=UTC
driver-class-name: com.mysql.cj.jdbc.Driver
username: root
password: root
initial-size: 1
min-idle: 1
max-active: 20
mybatis:
mapper-locations: classpath:mybaits/*Mapper.xml
type-aliases-package: com.example.shirospringboot.beans
|
整合shiro
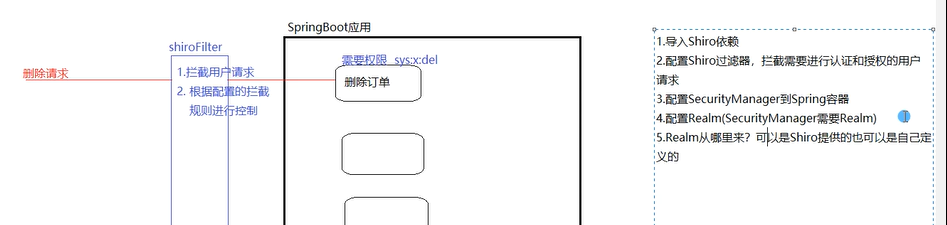
| 整合流程 |
| 1。引入shiro依赖,shiro-spring(包含shiro-web和shiro-core) |
| 2。配置shiro的过滤器,拦截认证Authentication和授权Authorization请求,若是登录login请求就不拦截 |
| 3。配置SecurityManager到spring中 |
| 4。配置SecurityManager中的安全数据Realm |
| 5。realm从哪来?可以是shiro.ini或者druid或自定义等等。 |
SpringBoot没有对shiro安全框架没有自动配置(SpringInitializr中没有shiro选项)是因为spring家族有自己的安全框架SpringSecurity。
ShiroConfig配置类(用java类而不是xml)
此类配置了shiroFilter(ShiroFilterFactoryBean),SecurityManager和IniRealm。并设置了过滤器的过滤规则
1
2
3
4
5
6
7
8
9
10
11
12
13
14
15
16
17
18
19
20
21
22
23
24
25
26
27
28
29
30
31
32
33
34
| @Configuration
public class ShiroConfig {
@Bean
public IniRealm getIniRealm(){
IniRealm iniRealm = new IniRealm("classpath:shiro.ini");
return iniRealm;
}
@Bean
public DefaultWebSecurityManager getDefaultWebSecurityManager(IniRealm iniRealm){
DefaultWebSecurityManager defaultWebSecurityManager = new DefaultWebSecurityManager();
defaultWebSecurityManager.setRealm(iniRealm);
return defaultWebSecurityManager;
}
@Bean
public ShiroFilterFactoryBean shiroFilter(DefaultWebSecurityManager defaultWebSecurityManager){
ShiroFilterFactoryBean filter = new ShiroFilterFactoryBean();
filter.setSecurityManager(defaultWebSecurityManager);
Map<String,String> filterMap = new HashMap<>();
filterMap.put("/","anon");
filterMap.put("/login.html","anon");
filterMap.put("/register.html","anon");
filterMap.put("/user/login","anon");
filterMap.put("/user/register","anon");
filterMap.put("/static/**","anon");
filterMap.put("/**","authc");
filter.setFilterChainDefinitionMap(filterMap);
filter.setLoginUrl("/login.html");
filter.setUnauthorizedUrl("/login/html");
return filter;
}
}
|
shiro的安全数据源
来自shiro.ini文件,配置在resource目录下,规定了用户的账号、密码、角色等等。
1
2
3
4
5
6
7
8
| [users]
zhangsan=123456,seller
laowang=654123,stockManager
admin=147258,admin
[roles]
admin=*
seller=order-add,order-del,order-list
stockManager=stock-add,stock-del,stock-list
|
业务流程
先配置入口请求,在PageController中,访问localhost:8080进入登录页面login.html。填写form表单中账号,密码后发送“/user/login”请求。在UserController中接收到此请求,调用userService认证是否登录成功。若成功跳转index.html页面,否则跳转login.html页面。(index和login页面都在templates目录下)。userService的认证流程是把username和pwd存入subject(就是UsernamPasswordToekn),再subject.login()认证,若失败则抛出异常。
1
2
3
4
5
6
7
8
| @Service
public class UserServiceImpl {
public void checkLogin(String username, String pwd) throws Exception {
UsernamePasswordToken token = new UsernamePasswordToken(username, pwd);
Subject subject = SecurityUtils.getSubject();
subject.login(token);
}
}
|
1
2
3
4
5
6
7
8
9
10
11
12
13
14
15
| @Controller
public class PageController {
@RequestMapping("/")
public String login(){
return "login";
}
@RequestMapping("/login.html")
public String login1(){
return "login";
}
@RequestMapping("/index.html")
public String index(){
return "index";
}
}
|
1
2
3
4
5
6
7
8
9
10
11
12
13
14
15
16
17
18
19
20
21
22
23
24
25
26
27
28
29
30
| @Controller
@RequestMapping("user")
public class UserController {
@Autowired
private UserServiceImpl userService;
@RequestMapping("/login")
public String loginToIndex(String username, String pwd){
try {
userService.checkLogin(username, pwd);
System.out.println("登录成功");
return "index";
} catch (Exception e) {
e.printStackTrace();
System.out.println("shibai");
return "login";
}
}
@RequestMapping("/register")
public String registerToIndex(String username1, String pwd1){
try {
userService.checkLogin(username1, pwd1);
System.out.println("登录成功");
return "index";
} catch (Exception e) {
e.printStackTrace();
System.out.println("shibai");
return "login";
}
}
}
|
1
2
3
4
5
6
7
8
9
10
11
12
13
14
15
16
| <!DOCTYPE html>
<html lang="en">
<head>
<meta charset="UTF-8">
<title>Title</title>
</head>
<body>
login
<hr>
<form action="/user/login">
<p>账号<input type="text" name="username"/></p>
<p>密码<input type="text" name="pwd"/></p>
<input type="submit" value="提交"/>
</form>
</body>
</html>
|
1
2
3
4
5
6
7
8
9
10
| <!DOCTYPE html>
<html lang="en">
<head>
<meta charset="UTF-8">
<title>Title</title>
</head>
<body>
index登陆成功后
</body>
</html>
|